Header bidding is the go-to monetization solution for most publishers with decent traffic on their sites. After the waterfall method, header bidding and its server-side version brought much-needed control and enabled publishers to get a fair price for their ad inventories.
However, even with all its benefits, header bidding is not perfect.
For starters, it is known to increase page latency. Without a good header bidding wrapper, adding and managing demand partners can also be challenging. To counter these problems, Google launched its version of server-side header bidding and named it Open Bidding (formerly Exchange Bidding in Dynamic Allocation – EBDA). Knowing that it can resolve the latency issues, publishers readily agree to get onboard.
Even though Open Bidding is easy to get started with, when it comes to getting access to the feature, Google made it a bit tricky. Why’s that? Well, Open Bidding is only available for publishers with Google Ad Manager accounts.
Once you get the Ad Manager account, you need to send an application to use Open Bidding. And then manually add demand partners after signing a contract. Now that you know the prerequisites, let’s help you set up exchange bidding.
Get Google Ad Manager Account
To get started with Google Ad Manager, publishers need to have AdSense access. Hence, creating an AdSense account is your first step to access Google Ad Manager. Typically, Google takes less than a week to approve an AdSense account.
Next, you need to visit Ad Manager login page. Here, you set up the account and choose a timezone and currency. Save these settings only when you are absolutely sure because you won’t be able to change them later.
Ad Manager audits your site for the content, audience, and previous earnings. If your inventory is eligible, you will get a confirmation email from Google Ad Manager.
In a case, you are unable to access Google Ad Manager, then you can try getting access to GAM from a Google Certified Publishing Partner (AdPushup is a GCPP and provides access to a GAM account). Also, working with a Google Certified Publishing Partner can save you the hassle of setting up and managing it on an ongoing basis.
Enable EBDA and Add Demand Partners
Publishers with standard accounts (or DFP with small publishers) need to manually enable the Open Bidding. This step is easier said than done. Given it requires the involvement of a Google representative or a Google Certified Publishing Partner, and the account holder must sign a contract explaining the product and policies.
As we mentioned, Open Bidding does enable you to access demand outside Google’s network, but publishers need to build a contractual relationship with partners (excluding Google). Inform the representative that Open Bidding is enabled for your account and provide details like domain and network ID. Wait for the representative’s response and follow the required next steps.
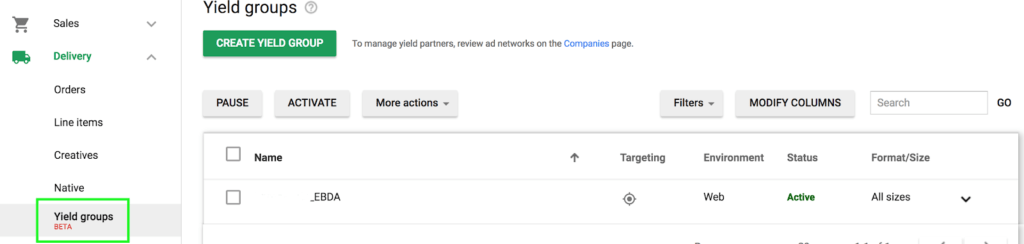
To check whether Open Bidding is enabled or not, try creating a Yield Group. If you don’t see any of such options and Yield Group is not available, then Open Bidding is not enabled yet.
Setting up Open (Exchange) Bidding
Ready with GAM account and Open Bidding is enabled? Follow these steps:
Step 1: Enable Open Bidding and Add Company
- Launch DoubleClick for Publishers (Google Ad Manager).
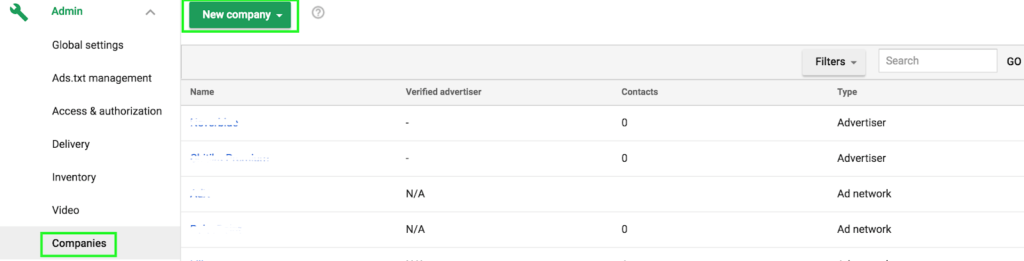
- Go to Admin > Companies.
- If the Company you desire is already on the list, then skip the next two steps.
- Otherwise, click on New Company > Ad Network
- Type the company’s name and choose the option from the drop-down (like OpenX_EBDA).
- When you see the company in the list, click on the ‘Enable for Open Bidding’ button.
- Click on Acknowledge and then Save it.
Note: If you haven’t signed an agreement with the ‘company’ before adding it for exchange bidding, then your account can be suspended.
Step 2: Add Yield Group
Yield group specifies the inventory you wish to enable for Open Bidding auction. It can include DoubleClick Ad Exchange and third-party ad networks. Here is how you can add yield groups:
- Go to Delivery > Yield groups.
- Choose to Create a yield group and give it an appropriate name.
- Now it’s time to customize the yield group such ad choose Ad Format (like banner, video, interstitial and more)
- Next, mention the environment where you will be running these ads (web, app or both).
- You can choose ad size or you can leave the section blank if you wish to target all the ad sizes.
- Define targeting. You can choose Run of Network to target all your inventory for the applied criteria.
- Also, you can add another yield partner to the same group by clicking on Add Another Yield Partner and don’t forget to choose integration type as Open Bidding.
- Finally, Save and Activate.
If everything is done correctly, then you will see bids coming in almost immediately after the setup.
In Closing
Open bidding can be tricky at the start. However, once you get hold of this, it can be very profitable, just like header bidding.
Google Ad Manager allows publishers to create custom yield reports. These reports can help the publisher understand the best and worst ad placements. Using which they can improve by working on weak aspects of the inventory.
If you have Ad manager 360 account, then Google provides you with an exclusive ad manager, with whose help you set it up. Even so, it is recommended to take help of ad ops professionals for better results.

Shubham is a digital marketer with rich experience working in the advertisement technology industry. He has vast experience in the programmatic industry, driving business strategy and scaling functions including but not limited to growth and marketing, Operations, process optimization, and Sales.